曾提過許多的 OpenCL 的 wrapper 都不重視 Image 這個型別, 僅僅提供 Buffer 的物件, 這樣的作法除了錯誤地認為都僅只是 memory buffer 外, 忽略了 GPU 架構設計上的本質是相當可惜的.
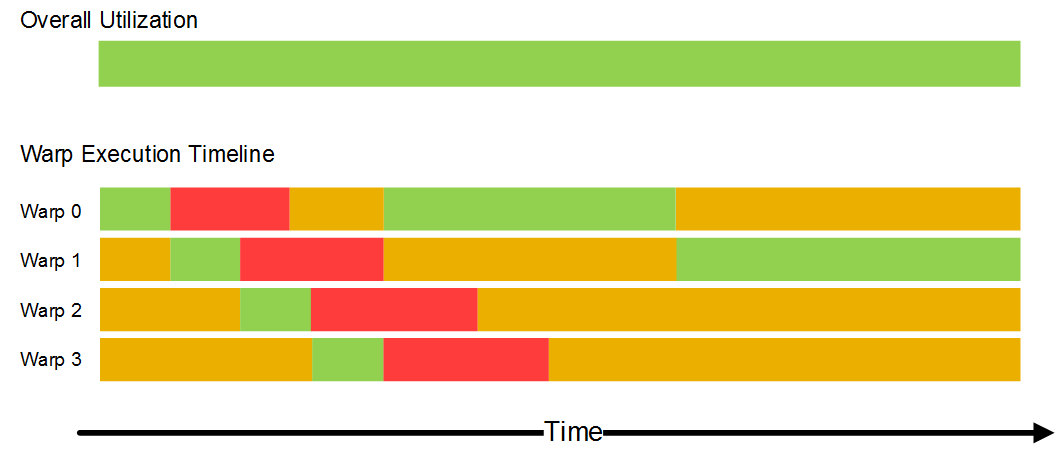
在 CPU 上 memory access latency 的降低仰賴的是 cache, 對於 GPU 而言靠的是 wavefront(warp)/threads 的切換來吸收, 這裡以 Imagination 曾經介紹過其 PowerVR Rouge 的運作機制 來做說明 (其他的 GPU有作法不同但本質相同或類似的方式):
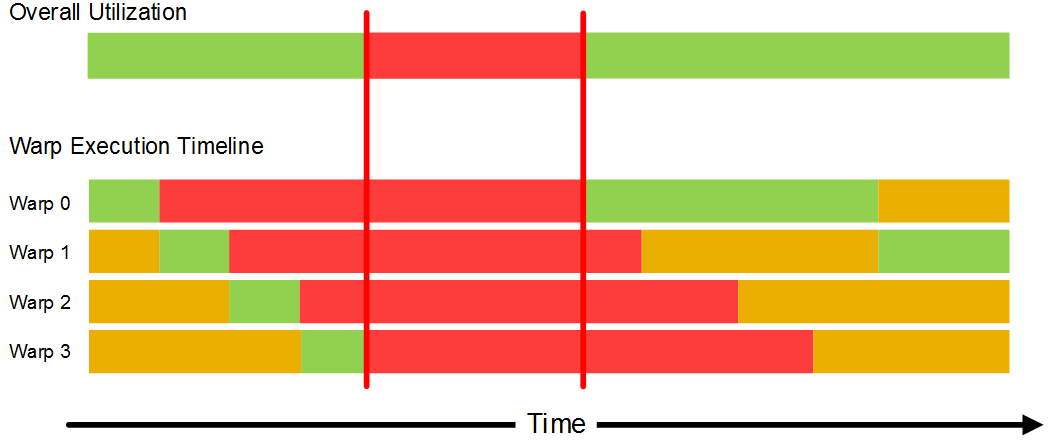
Rogue GPU 一個 Warp 基本上是 32-theads, 內部有著 16組 Warp slot 作排程切換, 由於每個 Warp 中的 32-threads 是以 lock-step 進行, 因此一旦有 thread 的執行狀態沒有被滿足整組 Warp 即被切為 idle state(紅色). 而如同上圖, GPU 是在期間一一切換尋找 ready state (黃色) 的 warp. 而如同影響 CPU 最大的一般, 其中最常出現的即為 memory latency. 一旦 memory latency 過高, 或是 bandwidth 不足就會發生下圖類似 CPU 的 memory stall 的情況:
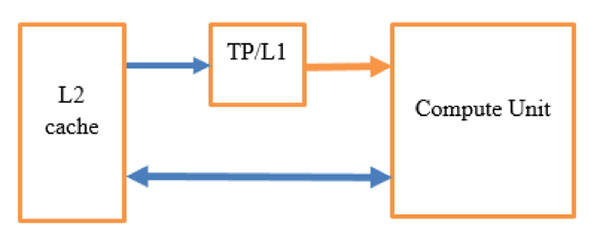
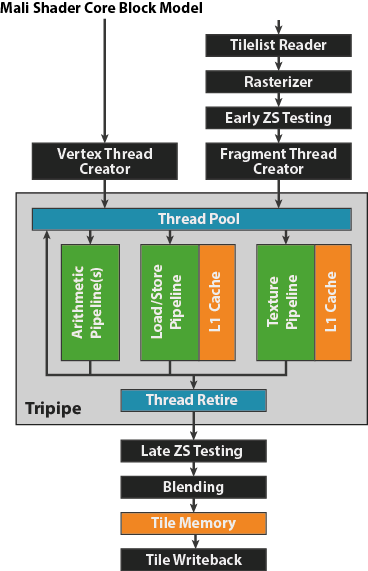
那麼這與 Image的使用有何關連? - 因為多數的 GPU texture unit 有著自己的 memory pipeline 與 cache. 這表示以 texture unit 搭配既有的 memory pipeline 合併使用, 因此能夠相較於僅使用 Buffer 的情況下, 提供 PE/ALU 更高的 memory throughput.
像是 Qualcomm 提及(TP 即為為 Texture Pipe):

而像是 ARM Mali GPU 的說明也很清楚:
其他 Intel, NV, AMD GPU 都有著類似的方式.
在 cltk 中提供了一個簡單的範例 - gemm, 其中 gemm.cl 有兩個 kernel, 兩者主要差異在於一個完全使用 Buffer 而另一個有使用 Image. 相信很多人有疑問, 為何 GEMM 能夠以 Image 方式實作. 這仰賴兩件事
- 以整數座標, 並且不使用 sampler 的方式來透過 read_imagef 來讀取 Image
- data layout 的擺放方式為 CL_RGBA
使用 image 的 kernel:
__kernel void sgemm_buf_img(不使用 Image 的 Kernel:
__global const float *A,
const int lda,
__global float *C,
const int ldc,
const int m,
const int n,
const int k,
__read_only image2d_t Bi
){
int gx = get_global_id(0) << 2;
int gy = get_global_id(1) << 3;
if ((gx < n) && (gy < m)){
float4 a[8];
float4 b[4];
float4 c[8];
for (int i = 0; i < 8; i++){
c[i] = 0.0f;
}
A += gy * lda;
for (int pos = 0; pos < k; pos += 4){
for (int i = 0; i < 4; i++){
b[i] = read_imagef(Bi, (int2)(gx >> 2, pos + i));
}
for (int i = 0; i < 8; i++){
a[i] = vload4(0, A + mul24(i, lda) + pos);
c[i] += a[i].x * b[0] + a[i].y * b[1] + a[i].z * b[2] + a[i].w * b[3];
}
}
for (int i = 0; i < 8; i++){
int C_offs = mul24((gy + i), ldc) + gx;
vstore4(c[i], 0, C + C_offs);
}
}
}
__kernel void sgemm_buf_only(
__global const float *A,
const int lda,
__global float *C,
const int ldc,
const int m,
const int n,
const int k,
__global const float *B
){
int gx = get_global_id(0) << 2;
int gy = get_global_id(1) << 3;
if ((gx < n) && (gy < m)){
float4 a[8];
float4 b[4];
float4 c[8];
for (int i = 0; i < 8; i++){
c[i] = 0.0f;
}
A += gy * lda;
for (int pos = 0; pos < k; pos += 4){
for (int i = 0; i < 4; i++){
b[i] = vload4(0, B + (pos + i)*ldc + gx);
}
for (int i = 0; i < 8; i++){
a[i] = vload4(0, A + mul24(i, lda) + pos);
c[i] += a[i].x * b[0] + a[i].y * b[1] + a[i].z * b[2] + a[i].w * b[3];
}
}
for (int i = 0; i < 8; i++){
int C_offs = mul24((gy + i), ldc) + gx;
vstore4(c[i], 0, C + C_offs);
}
}
}
以下為在個人的 Geforce 860M 上的執行結果
$ LD_LIBRARY_PATH=. ./gemm兩者間有著近 30% 的效能差距, 若搭配 local memory 的使用或是在手機平台, 效能差距比例應會更明顯.
build log:
cltk_image_alloc w[1024] h[1024] p[1024] us[16]
B pitch 1024 usize 16
pitch 16384
main test overhead gemm takes 103910 us
check result 1...
main test overhead gemm_buf takes 130500 us
check result 2...
這個 GEMM 的範例主要參考自 Qualcomm 的 Optimization 文章, 並撰寫對比的 kernel
- Matrix Multiply on Adreno GPUs – Part 1: OpenCL Optimization
- Matrix Multiply on Adreno GPUs – Part 2: Host Code and Kernel


沒有留言:
張貼留言